Student Management
My Class is designed to connect student blogs to their class blog, course blog or year level blog where the teacher can control privacy, comment moderation, post moderation and what students can do on their sites with just one click.
Posts from all sites connected to the class blog via My Class are automatically feed into the reader in the dashboard where students and the teacher(s) can read and comment on each others posts.
If you are using one of our authentication options the users will be created as LDAP, Google Apps, or Shibboleth users depending on which authentication option you are using.
You may also find information on our LMS Integration with Canvas and Blackboard/LTI useful.
Table of Contents
Network Activate Classes
The My Class menu item is added to the dashboard of all sites when the Classes plugin is network activated in Plugins > Plugin Management in the network admin dashboard.

The Classes plugin should not be network deactivated if it is being used to manage student blogs. You can check Class usage and control access to My Class menu items using Settings > Classes in network admin dashboard.
Classes Settings
The Classes Settings page in network admin dashboard is where you can see usage statistics of class blogs and student blogs and when you control My Class features.

Turn Off My Class
All My Class menu items are removed in the dashboard of all blogs when “Turn off “My Class” student management feature” is selected. Any student blogs attached to a class blog via My Class will remain attached to the class blog but teachers won’t be able to access My Class > Student blogs and won’t be able to create new student blogs.
You would only select “Turn off “My Class” student management feature“if you wanted to disable My Class.

Don’t allow teachers to create new student users and blogs
By default, a teacher is able to create new student users and student blogs using My Class > Add Student Users and My Class > Create Student blogs.
When “Don’t allow class admins (teachers) to create new student users and blogs” is selected it removes the menu items My Class > Add Student Users and My Class > Create Student blogs.
You would select this option if you wanted all student users and student blogs created by the super admin user only using batch create. More commonly used when you want to control the naming convention of usernames and site URLs.

Super Teachers
A super teacher is able to access the dashboard of all class and student blogs on your CampusPress network without being added as a teacher user to the class blog. This option is used when students use their sites for all subjects with numerous teachers. For this scenario the student blogs are often attached to a year level class blog with one teacher user and the other teachers access by being assigned the super teacher role.

Class default settings
The class default settings control the default settings listed in My Class > Settings when My Class is set up on a site.
For example, if you wanted the default moderation on student blogs to be “I must approve all posts” and “I must approve all comments” you would select both these options. Teachers can change the defaults to their preferred settings when setting up My Class.

If you don’t want teachers to be able to change specific settings you can hide the settings from them. For example, if you want to make all student blogs private only visible to logged in users of your CampusPress network you would select Only registered users of the network can view this site and then select Privacy setting in the Hide Settings for Teachers. This hides the option to change privacy of student blogs from the teacher user.

Set Up My Class
You set up My Class on a class blog as follows:
1. Go to My Class > Create a Class.

2. Select “This is a class blog” (1), ”No – use if you want them to publish posts on their student blog” (2), choose if you want to moderate posts and comments on student blogs (3), your preferred privacy option (4) and which teacher users you want to manage your student blogs (5).
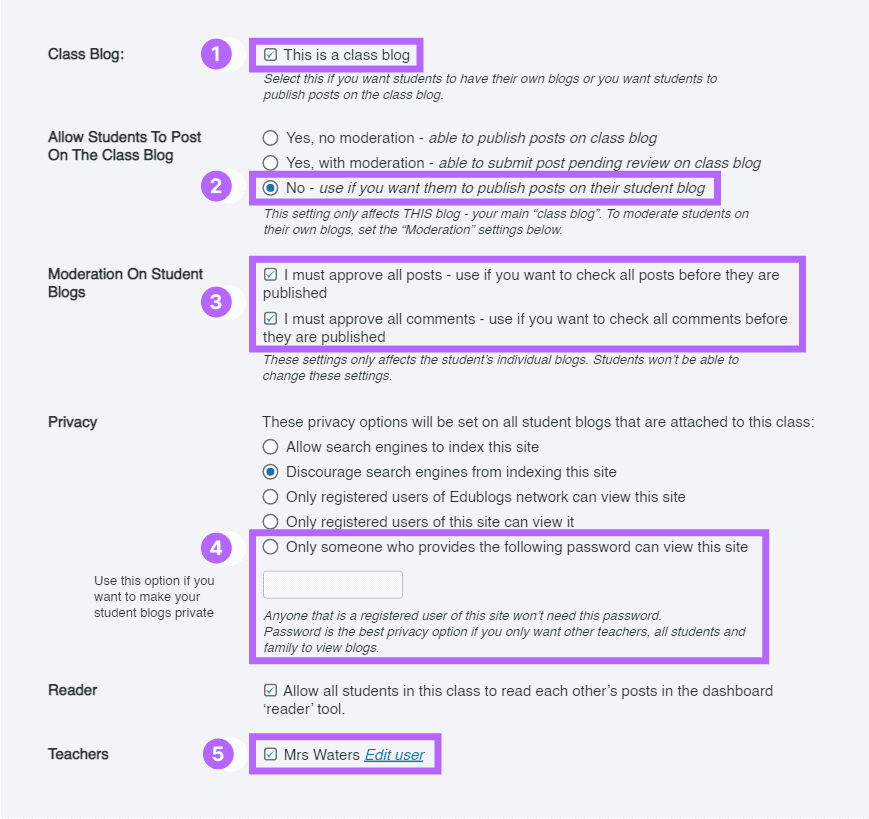
3. Choose your student permissions.
For example, if you unselect Switch themes it means students can customize their theme but can’t change to a new theme.

To prevent students from adding new content while their work is being graded you would unselect Add/Edit Posts and Add/Edit Pages.
4. Select the blog template you want to use.

The default blog template option is displayed if you’ve set up template sites for My Class in Site Templates in the network admin dashboard.
5. Click Save.
6. The My Class menu changes to the menu item shown below.

Multiple Classes
You can only connect student blogs to one class blog using My Class. If you need several teachers to be able to access and moderate student blogs you add multiple teacher users by selecting their usernames under Teachers in My Class > Settings in the dashboard of the site or add them as super teachers in Settings > Classes in the network admin dashboard.
You assign the super teacher role as follows:
1. Go to Settings > Classes in network admin.

2. Add their user IDs or usernames separated by commas.
3. Click Save.
Template Site
You can set a default blog template in My Class > Settings so that all student blogs created using My Class > Create Student blogs have the same appearance and customized content in posts and pages. Follow our support documentation to set up your blog template.
To display a list of template blogs in My Class > Settings you need to set up blog template categories as follows:
1. Go to Site Template > Template Categories in the network admin dashboard.

2. Add the template category name, category description and select if you want ‘Allow teachers to choose a template from this category as a default for new student blogs’ or use the template on your sign up page then click Add Category.

3. When you create a new template blog in Site Templates > Site Templates you’ll see an option to assign a template to a template category.

With the student template category selected a teacher now sees a default blog template they can select from in My Class > Settings and this template is applied to all student blogs when the blog is created using My Class > Create student blogs or Users > Invite Users.
Attach to Class blog Using Batch Create
You can create and attach new student blogs to a class blog using Batch Create. My Class must be set up on the class blog using My Class > Create Class before it can be used as a Class blog.
The final step in Batch Create if My Classes is network activated is an option to connect student blogs to a class blog.
You connect to the class blog as follows:
Add the class blog ID by searching using the blog path. When you type in the blog path into the ‘search by blog path’ field it automatically searches for the blog URL.

Refer to our support documentation for Batch Create for more information.
Class and Student Blog Reports
You can download a report that lists all your class blog URLs as follows:
1. Go to Dashboard > Reports & Batch Edits in network admin.

2. Select Is Class site from under the Choose predefined options.

- For networks that host over 10,000 sites, we recommend you index in 1-2 year date ranges and download a series of reports.
3. Click Run Index to Generate Report.
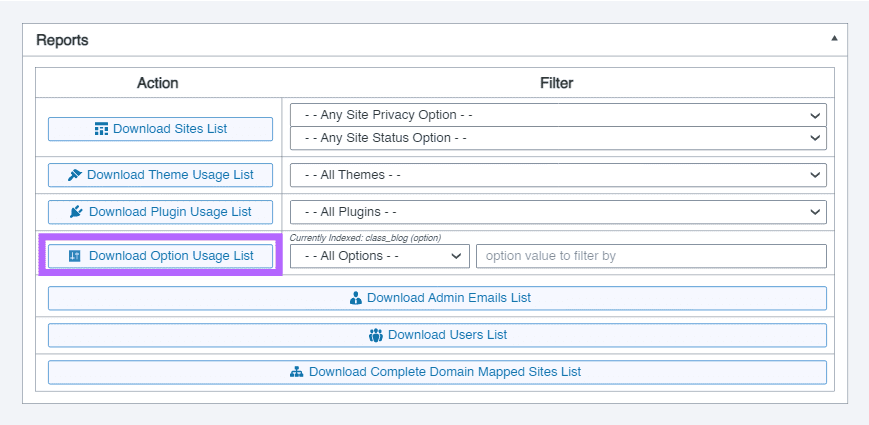
4. Once you’ve finished indexing you click to download the Options Usage list to obtain a list of the class blog.
You run a new report to obtain a list of student blogs attached to the class blogs via My Class as follows:
1. Click on Clear Index.
2. Select Is Student site from under the Choose predefined options.

3. Click Run Index to Generate Report.
4. Once you’ve finished indexing you click to download the Options Usage list to obtain a list of the student blogs. The alternative option is to download the Sites List. All student blogs will have a number in the data column and the number represents the class blog that the student blog is attached to.
The student blog ID is listed in Column A under ID and the Class blog ID the student blog is attached to is listed in Column E under Data.
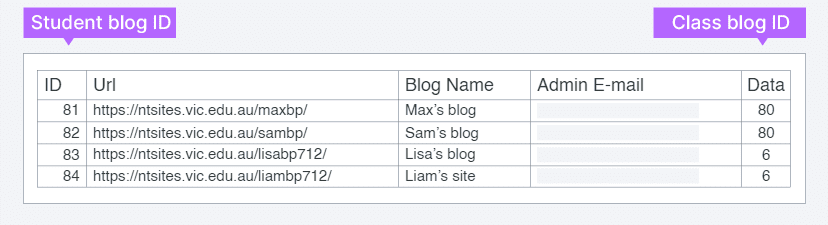
You can cross reference the Student blog data with the Class blog data to identify the class blog URL or search sites using the class blog ID.
Site search in network admin using blog ID 6 returns the following class blog URL.

Batch Add or Remove from Class blog
You are able to either batch add a list of existing student blogs to a class blog and bulk remove student blogs from a class blog using Batch Edits in network admin.
You add student blogs to a class blog as follows:
1. Go to Dashboard > Reports & Batch Edits in network admin.
2. Add the sitenames, site IDs or the site URLs of the student blogs you want to attach to the class blog via My Class.

3. Select Attach sites to class from Actions drop-down menu and add the class blog ID.

4. Add the class blog ID by searching using the blog path. When you type in the blog path into the ‘search by blog path’ field it automatically searches for the blog URL.

My Class must be set up on the class blog using My Class > Create Class before it can be used as a Class blog.
If the student blogs are already attached to a class blog you need to first remove their blogs from that class blog before you can add their blogs to a new class blog.
Once it has found the blog URL click on URL to add the blog ID.

5. Click Submit.
You remove student blogs from a class blog as follows:
1. Go to Dashboard > Reports & Batch Edits > Batch Edits in network admin.
2. Add the sitenames, blog IDs or the blog URLs of the student blogs you want to remove from a class blog.
3. Select Remove student sites to class from Actions drop-down menu.

Invite Users
Student blogs are automatically attached to the class blog if either existing users or new users create their student blogs using Invite code. Invite code is created in Users > Invite Users.
You can also categorize blog templates to enable users to select from template blogs when a user creates their blog using Invite code as follows:
1. Go to Site Template > Template Categories in the network admin dashboard.
2. Add the template category name, category description and select if you want ‘Allow teachers to choose a template from this category as a default for new student blogs’ or use the template on your sign up page then click Add Category.

3. When you create a new template blog in Site Templates > Site Templates you’ll see an option to assign a template to a template category. You need to select the template for your sign up form.

4. Go to Settings > Signup & Invites > Signup form

5. Scroll down and select New Site templates.

6. Click Save.
7. With the student template category selected the users now see options to select a site template when they create a new site using Invite code (created in Users > Invite Users).
My Class Documentation for Your Users
You’ll find more information on using My Class here: