Reports / batch edit / audit logs
Looking for end-user support?
This area is for Super Administrators and others interested in the overall management of WordPress sites and networks that we host.
>> Search our end-user support documentation here.
We have built many tools on top of WordPress that are available to our users.
Below is our documentation on how to use the tools that are intended for Super Admin users.
Table of Contents
Reports
Reports & Batch Edits in the network admin dashboard enables a super admin user to:
- Generate Sites Reports
- Generate User Reports
- Batch Edit
The following usage reports can be downloaded:
- Sites List – sites listed by their URL, site name, admin email address, number of users, number of posts, number of pages, created (date site created), updated (most recent date a post, page or custom post type was published or modified after publication or the most recent date the privacy of the site changed in Settings > Reading), privacy, theme and status.
- Theme Usage – lists theme usage on all sites by URL, site name, admin email address, theme name and status, and can be filtered by theme.
- Plugin Usage – lists plugin usage on all sites by URL, site name, admin email address, plugin name and status, and can be filtered by plugin.
- Complete Users List – users listed by their username, email address, First name, last name, date username created, number of sites they are attached to and their authentication method.
Reports are generated as follows:
Go to Dashboard > Reports & Batch Edit in the network admin dashboard.

Sites Report
You can download sites reports as follows:
1. Go to Dashboard > Reports & Batch Edits > Sites Report in network admin.
1. Click on Run Index to Generate Reports.
- On networks with more than 6,000 sites you need to use the Index Sites options to index the network in smaller batches.
- For example, set the date range for a year and then click Run Index to Generate Reports. Click Clear Index to run the next date range once you’ve downloaded the year’s reports.
- You’ll see a progress bar while it is indexing the network.

2. The reports appear once it has finished indexing.

3. Click on the report you want to download.
4. Open the report in your spreadsheet software and use Sort to sort the data.
Here is how to download a list of all class blogs and student blogs using the additional data option:
Class Blog Report
You can download a report that lists all your class blog URLs as follows:
1. Go to Dashboard > Reports & Batch Edits >Sites Report in network admin.
2. Select Is Class site from under the Choose predefined options.

For networks that host over 6,000 sites, we recommend you index in 1-2 year date ranges and download a series of reports.
3. Click Run Index to Generate Report.
4. Once you’ve finished indexing you click Download Options Usage List to obtain a list of the class blog.

Student Blog Report
You run a new report to obtain a list of student blogs attached to the class blogs via My Class as follows:
1. Click on Clear Index.
2. Select Is Student site from under the Choose predefined options.

3. Click Run Index to Generate Report.
4. Once you’ve finished indexing you click to download the Options Usage list to obtain a list of the student blogs.
The student blog ID is listed in Column A under ID and the Class blog ID the student blog is attached to is listed in Column E under Data.
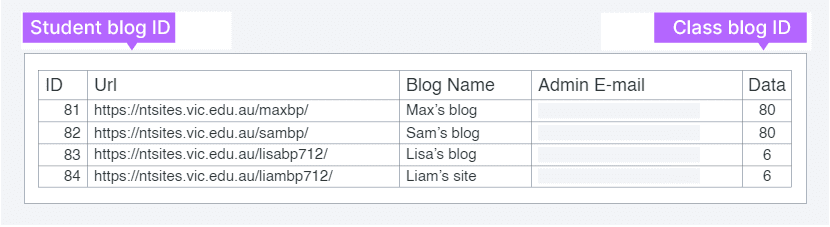
You can cross reference the Student blog data with the Class blog data to identify the class blog URL or search sites using the class blog ID.
Site search in network admin using blog ID 6 returns the following class blog URL.

The alternative option is to download the Sites List report. Student blogs will have a number listed in the data column and this number identify the Class blog ID.
User Reports
User reports enables you to download a complete user list, listed by their username, email address, First name, last name, date username created, number of sites they are attached to and their authentication method.
On networks with more than 6,000 sites you need to use the Filter users created from to index the network in smaller batches by date range.
You can download a report that lists all your users as follows:
1. Go to Dashboard > Reports & Batch Edits > User Reports in network admin.
2. Click Download Users List.
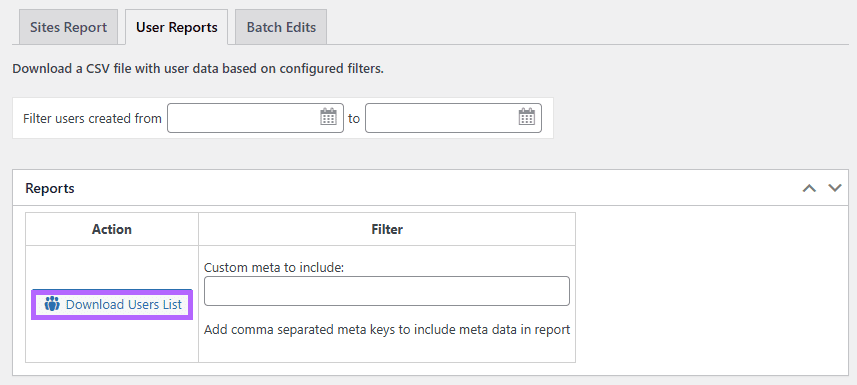
Using Custom Meta
To generate a User Report for a Specific Subsite, in the “Custom meta to include:” field, enter the following meta:
wp_#_capabilitiesNote: Replace # with the specific blog ID for which you wish to generate the user report. The report will initially display a list of all users across the network. You will need to remove any rows where the WP Capabilities column is empty to view the relevant user list for the selected subsite.
Including Additional Meta Data
You can use other meta keys to include additional data in the CSV file. Examples of useful meta keys include:
campus_login_date: Displays the user’s last login date.primary_blog: Shows the user’s primary blog ID.
Note: If you want to use multiple meta keys in the “Custom meta to include:” field at once, the meta key values must be comma-separated in the following manner:
campus_login_date, primary_blog, wp_#_capabilitiesBatch Edit
Batch edit enables you to:
- Bulk archive/unarchive sites.
- Change user roles of all sites users are member of.
- Remove users from all sites (but not delete them).
- Remove one user from a list of sites.
- Change user account authentication type.
- Change the privacy of a site.
- Change site theme.
- Activate/deactivate plugin.
- Remove student blogs from class.
- Attach sites to a class blog.
You use Batch edit as follows:
1. Go to Dashboard > Reports & Batch Edits > Batch Edits in the network admin dashboard.

To remove usernames:
1. Add the usernames.
2. Select Remove users from all Sites (but not delete them) from Actions drop down menu.

3. Click Submit.
To change themes, plugins, privacy or archive sites:
1. Add the sitenames.
- If you use URLs it needs to be written in the form of http://myschool.com/mysite
2. Select Archive sites, Change Privacy of a Site, Change Site theme, Activate or Deactivate plugin from the Actions drop down menu.
- Note: You can’t change privacy on a site attached to a class blog via My Class. The site needs to be removed from the class blog or the privacy needs to be changed in My Class > Settings.

3. Click Submit.
Batch Add or Remove from Class blog:
You are able to either batch add a list of existing student blogs to a class blog and bulk remove student blogs from a class blog using Batch Edits in network admin.
You add student blogs to a class blog as follows:
1. Go to Dashboard > Reports & Batch Edits > Batch Edits in network admin.
2. Add the sitenames, site IDs or the site URLs of the student blogs you want to attach to the class blog via My Class.

3. Select Attach blogs to class from Actions drop-down menu and add the class blog ID.

4. Add the class blog ID by searching using the blog path. When you type in the blog path into the ‘search by blog path’ field it automatically searches for the blog URL.

My Class must be set up on the class blog using My Class > Create Class before it can be used as a Class blog.
If the student blogs are already attached to a class blog you need to first remove their blogs from that class blog before you can add their blogs to a new class blog.
Once it has found the class blog URL click on URL to add the site ID.

5. Click Submit.
You remove student blogs from a class blog as follows:
1. Go to Dashboard > Reports & Batch Edits > Batch Edits in network admin.
2. Add the sitenames, site IDs or the site URLs of the student blogs you want to remove from a class blog.

3. Select Remove student sites from class in the Actions drop-down menu.

Audit Logs
Audit logs provide information on user activity to help you identify who made changes to which site and what change was made. Audit logs are kept for 30 days and can be exported. With Audit logs you can track:
- Role changes
- Network option changes
- Users being added to sites
- Users being removed from sites
- Login success
- Failed logins
- Media file deletions
- User registrations
- User deletes
- Post deletes
- Post Edits
- New Posts
- Page deletes
- Page Edits
- New Pages
- Theme switches
- Archiving of sites
- Site deletion
- Plugin activation
- Plugin deactivation
- Domain mapping deactivation
- Include usernames in logged events
You change what is being tracked in Dashboard > Audit logs > Settings.
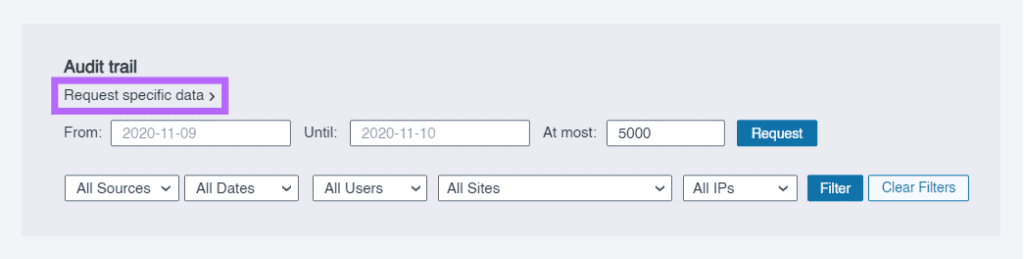
Go to Dashboard > Audit logs in the network admin dashboard to access your audit logs.

Your latest audit logs are displayed. Requests are cached for up to 10 minutes in the admin interface.

You can request specific date ranges as well as filter the logs by source, type, users, sites, IP.