Domains: custom / mapping / SSL certificates
Looking for end-user support?
This area is for Super Administrators and others interested in the overall management of WordPress sites and networks that we host.
>> Search our end-user support documentation here.
We have built many tools on top of WordPress that are available to our users.
Below is our documentation on how to use the tools that are intended for Super Admin users.
Table of Contents
Custom Domains
The Domain Mapping plugin allows you to apply custom domains to sites on your network.
For example, you may have a site on your network with a domain like sites.myschool.edu/sciencelab/ and you would like to use the shorter domain sciencelab.myschool.edu for that site instead.
CampusPress needs to install and configure the Domain Mapping plugin before you can use it. Please send an email to contact@campuspress.com if you would like the Domain Mapping plugin added to your network.
Once we configure the plugin, any super admin will be able to apply a custom domain, that you own, to sites hosted on your CampusPress network. All mapped domains are listed in Domain Mapping in your Network Admin Dashboard.
Please note:
Domain mapping is set to use the original domain for logged-in users when viewing the wp-login page, wp-admin pages, and on the front end.
For example, when the user logs into their mapped domain such as sciencelab.myschool.edu they will be redirected to their original domain sites.myschool.edu/sciencelab/wp-login.php. If they are in their site’s dashboard and click on Visit Site, View Page, or View Posts, then the original domain sites.myschool.edu/sciencelab/ will load.
All logged out users will see the mapped domain sciencelab.myschool.edu.
Sites are cached for logged-out users for server performance reasons. To preview changes made to a site with a mapped domain, the site should be viewed on the original domain as a logged-in user.
Domain mapping is intended for use on sites set to allow search engines or block search engines. On private sites you need to change it to allow search engines or block search engines in Settings > Reading an hour before activating the domain in Tools > Domain mapping otherwise you can get a redirect error.
Domain Mapping a Site
To add a new mapped domain:
- Go to Tools > Domain mapping in the dashboard of the site you want to domain map. Only logged-in super admin users see Tools > Domain mapping in the dashboard of sites. This menu item is hidden from all other users.

2. Add the custom domain you want to use and then click Add.

3. Once you add your mapped domain, you will be given the DNS configuration that is needed to point your domain to our servers.
Typically this will be a set of CNAME records that you will need to add, but sometimes there will be an A record that is needed as well.

4. Log into your domain registrar’s DNS panel and use the provided DNS configuration to update your domain’s DNS configuration.
Domain registrars have different requirements for how DNS records are added. If you have any issues adding the hostnames or the values that we provide, then send a support request to the company or organization you’ve purchased the domain name from to request they add the records for you.
5. Once you have updated the DNS settings for your domain and the DNS has propagated, go back to the Tools > Domain Mapping in the dashboard of the site and click the “Activate” button to activate the mapping.
(If you need to check to see if your DNS changes have propagated, go to https://dnschecker.org/ to confirm the CNAMEs or A Records have resolved.)

Please note:
Once you activate your mapping, there will be a period of time needed for that new mapping to propagate. Some mapped domains might start working very quickly, but you should generally expect a delay between when the mapping is activated in the site’s dashboard and when the new domain will begin working.
There is no definite ETA but we recommend allowing 30-60 minutes for newly mapped domains to start working. You may see an OK message or a redirect error on the custom domain until the domain starts working. Send an email to contact@campuspress.com if it takes longer than an hour.
For high-profile and high-traffic sites, we recommend using the Move tool explained below to avoid any issues with the site being unavailable while the mapping propagates.
Moving a Mapped Domain
The Domain Mapping tool also allows you to effortlessly move a mapped domain from one site to another within your network using the Move feature. This makes it easier to transfer a domain when needed and speeds up the mapping process.
This is particularly useful during Pre-Map for DNS Propagation, as you can map the domain to a temporary “holding” site before applying it to the final site. This allows the DNS propagation to complete ahead of time, minimizing downtime during the transition.
By handling the domain mapping and SSL propagation on the temporary site, the final site will be live almost immediately when the domain is applied.
Steps to Move a Mapped Domain
From your site dashboard:
- Go to Tools > Domain Mapping
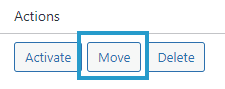
- Click the Move button under the Actions section of the configuration tool
3. A new field will open, add the Site ID of the site you want to move the domain to, and click Move.
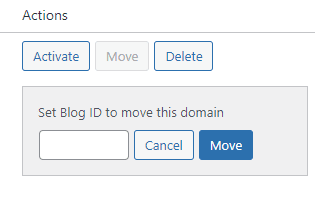
4. Your mapped domain will now be moved to the new site.
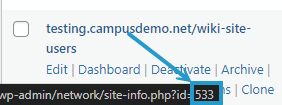
Finding your Site ID
The site ID can be found in Network Admin > Sites > All Sites. By hovering over the Domain URL, the site ID can be found at the bottom left of your screen.
SSL Certificates
On your CampusPress network you have the option to force SSL at login and wp-admin (Dashboard) or everywhere. By default CampusPress forces SSL at login and wp-admin. Our team will check with you on your preference during your network setup.
If your preference changes at any time please send an email to contact@campuspress.com so our team can help update this for you.
We have two options for adding SSL certificates for mapped domains:
- We can send you a CSR so that you can generate your own SSL certificate. You would then send that certificate back to our support team and we would install it for you.
- We can install a Let’s Encrypt (LE) certificate for your mapped domains. These will auto-renew every 90 days (30 days before expiry) as long as the mapped domain is still active on your network and Let’s Encrypt is able to verify the DNS.
Using Your Own SSL Certificate
If you wish to use your own SSL certificate, we recommended installing the certificate before you activate the mapped domain. This will help minimize any period during which visitors will see an SSL warning.
In order to generate your certificate, you’ll want to send us an email requesting a CSR for the new domain.
Some networks prefer to have a separate CSR generated for each individual domain, while others send an updated list of all of the mapped domains on their network and have us generate a CSR for the entire updated list. (Most SSL certificate providers will allow either up to 50 or 100 domains on a single certificate.)
By default, the Common Name (CN) on new CSRs is automatically set as your CampusPress URL. If you do not want the CampusPress URL as the CN on every new CSR, then please specify the CN you want to use. You will also want to send a list of all the domains that should go on the CSR. Please make sure this is a single spaced list with the domains only, no punctuation or other text should be included.
Please note:
This is what a CSR request should look like so that our team can process it quickly for you:
Please send us a new CSR with sciencelab.myschool.edu as the CN. Please include the following domains on the CSR:
sciencelab.myschool.edu
www.sciencelab.myschool.edu
englishlit.myschool.edu
www.englishlit.myschool.edu
Our support team will generate the CSR and email it back to you. You will then use that CSR to request your SSL certificate from the provider of your choice.
Once your certificate is ready, you can either download the certificate along with your provider’s intermediate certificates in PEM format and email them to us, or email us the links they provide so we can download them.
Our support team will then install the certificates and then send confirmation the certificate has been installed.
Using A Let’s Encrypt Certificate
Let’s Encrypt (LE) checks every 30 minutes for new mapped domains and automatically installs a new LE Certificate.
The mapped domain needs to be activated in Tools > Domain Mapping and Let’s Encrypt must be able to verify the domain’s DNS is correct before it will add the certificate for the domain.
If you are using forced SSL everywhere this means SSL is forced on the front end and you will have an SSL error until the LE certificate is installed. For those using forced SSL we recommend you send our support team an email as soon as you activate a new mapped domain and request we manually install the LE certificate. Please include the mapped domain and the original domain in the support request. This speeds up the process of applying the LE certificate to the newly mapped domain but can take up to 1-2 hours if Let’s Encrypt has issues validating the DNS.