Cloning & staging
Looking for end-user support?
This area is for Super Administrators and others interested in the overall management of WordPress sites and networks that we host.
>> Search our end-user support documentation here.
We have built many tools on top of WordPress that are available to our users.
Below is our documentation on how to use the tools that are intended for Super Admin users.
Table of Contents
Cloning & Staging
Super Administrators can easily clone sites.
This can be useful for:
- moving a site to a new URL
- setting up a staging/testing environment
- creating multiple sites from one template
- keeping backup copies of important sites
How to Clone
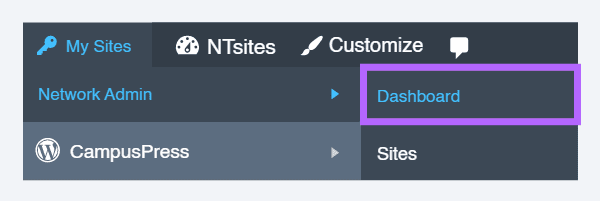
1. Go to My Sites > Network Admin > Dashboard.

2. Locate the site you want to clone by searching the site URL using ‘Search Sites‘ on the Right Now module.
3. Hover the mouse over the blog URL to reveal the action menus and click on Clone.

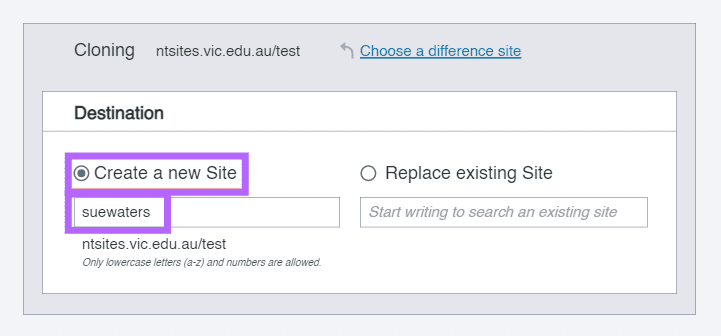
4. Select Create a new Site and add your new site name.

5. Add your new blog title or leave as Clone blog title.
6. Click Clone Site.
Using Cloner for Staging
It is important to know that the clone tool can also overwrite any existing site.
This means that you can make a clone of an existing site, make changes on the cloned version, and then clone again back over the original.
This can be a great tool for testing theme changes or updates to sites without having to make these changes on the live site.
When making changes on the ‘staging’ site, you can temporarily change the privacy setting so that it isn’t public on the web until you are ready to push it live.
You replace an existing site as follows:
1. Select Replace existing site.
2. Type in the site name and it should automatically search for the site URL.
3. Click Clone Site.
4. You’ll see the following message and click on Continue if you agree to permanently overwrite the contents of the existing blog.